Sunday, August 16, 2020

Jmeter Assertions - Response Assertion

Assertion in JMeter is used to validate response of the request that you have sent to the server.

HTTP request/response 

In the above picture, Request (contains Method, Resources, Headers and Content) is sent from client machine and processed by server machine and sent back the Response (Contains Status code, Headers and Content) to client machine.

JMeter assertion is used to validate the Response (Either Response code or Content) with the expected result (You must know the expected result).

When we are talking about assertion, we must know to how to add assertion in the JMeter test plan.

Remember few points when you are working with JMeter assertions.

  • Assertion is always executed after your sampler and post processor executed.
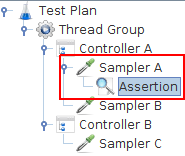
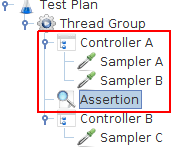
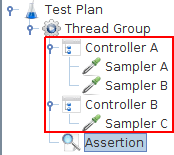
  • Assertions apply to samplers defined at same level or below them. If none, it applies to the parent sampler only.
Let us understand the second point in detail now.

Assertion Location 1
In the case above, the Assertion only applies to Sampler A.

Assertion Location 2

In this case, the assertion applies to Sampler A and Sampler B because Assertion and Controller are in same level.

Assertion Location 3

In this case, the assertion applies to Sampler A and Sampler B and Sampler C as Assertion is in same level as Controller A and Controller B.

There are multiple assertions available in JMeter. We will go through few assertions which we are using frequently in JMeter test plan.

1. Response Assertion

Response assertion is used to check whether the response contain, match or equal a specified pattern (expected result).


In the above picture, Apply to section is used to define the samplers that can generate sub-samples, e.g. HTTP Sampler with embedded resources or samples generated by the Transaction Controller and it has 4 different options. 

  1. Main sample - assertion only applies to the main sample
  2. Sub-samples - assertion only applies to the sub-samples
  3. Main sample and sub-samples - assertion applies to both.
  4. JMeter Variable - assertion is to be applied to the contents of the named variable
Response Field to Test:
This option is used to instructs JMeter which field of the Response to test.

Text response – This is for the response which can be displayed in a browser. You can check particular text is present in the response or not.

Document (text) – This is for anything supported by Apache Tika (it assumes apache-tika.jar placed in /lib folder of a JMeter installation). For example: PDF, Office, Audio, Video formats. This can be memory consuming for high loads. I would suggest not to use this unless no other option.

URL Sampled – This assertion is used against a requested URL to ensure that it matches expectations. It’s handy for testing. For example: you may want to check that the redirect URL doesn’t contain an “error” somewhere in the path.

Response Code – This validate the response code which is expected. For 4xx and 5xx response codes, make sure that you have checked the “Ignore Status” box. If not, 4xx and 5xx will give an error even though you specified 4xx/5xx as expected result.

Response Message – This is used to verify that the response message appears as expected.

Response Headers – This is used against Response Headers to see if a specific HTTP Header is present or absent.

Ignore Status – JMeter out-of-the-box considers all 4xx and 5xx responses as failures. If your test case is “negative” and, for example, a “404” error is expected, you’ll need to check this box to suppress JMeter’s built-in status code check and substitute it with your own status code assertion.

This is sample test result.


Let us validate all the options now. In the following example, I am going to hit the URL "https://reqres.in/api/users?page=2" which gives the below response.

{"page":2,"per_page":6,"total":12,"total_pages":2,"data":[{"id":7,"email":"michael.lawson@reqres.in","first_name":"Michael","last_name":"Lawson","avatar":"https://s3.amazonaws.com/uifaces/faces/twitter/follettkyle/128.jpg"},{"id":8,"email":"lindsay.ferguson@reqres.in","first_name":"Lindsay","last_name":"Ferguson","avatar":"https://s3.amazonaws.com/uifaces/faces/twitter/araa3185/128.jpg"},{"id":9,"email":"tobias.funke@reqres.in","first_name":"Tobias","last_name":"Funke","avatar":"https://s3.amazonaws.com/uifaces/faces/twitter/vivekprvr/128.jpg"},{"id":10,"email":"byron.fields@reqres.in","first_name":"Byron","last_name":"Fields","avatar":"https://s3.amazonaws.com/uifaces/faces/twitter/russoedu/128.jpg"},{"id":11,"email":"george.edwards@reqres.in","first_name":"George","last_name":"Edwards","avatar":"https://s3.amazonaws.com/uifaces/faces/twitter/mrmoiree/128.jpg"},{"id":12,"email":"rachel.howell@reqres.in","first_name":"Rachel","last_name":"Howell","avatar":"https://s3.amazonaws.com/uifaces/faces/twitter/hebertialmeida/128.jpg"}],"ad":{"company":"StatusCode Weekly","url":"http://statuscode.org/","text":"A weekly newsletter focusing on software development, infrastructure, the server, performance, and the stack end of things."}}
Example 1: Now I am going to add the response assertion to validate the response. I am expecting "total_pages" content should be part of response. Or else, I assume the response is invalid.
So the option I choose: Field to Test is "Text Response" and Pattern matching rule is "contains" and Pattern to Test is "total_pages"


Response for the sampler is shown below. The expected text "total_pages" is available in the response. Hence, the assertion is passed.


Example 2: I am expecting "200" as a response code. Or else, I assume the response is invalid.
So the option I choose: Field to Test is "Response Code" and Pattern matching rule is "equals" and Pattern to Test is "200"
Response for the sampler is shown below. The expected response code "200" is returned from the server. Hence, the assertion is passed.
Example 3: I am expecting "OK" as a response message. Or else, I assume the response is invalid.
So the option I choose: Field to Test is "Response message" and Pattern matching rule is "matches" and Pattern to Test is "OK"
Response for the sampler is shown below. The expected response message "OK" is returned from the server. Hence, the assertion is passed.
Example 4: I am expecting "Set-Cookie" as part of response headers. Or else, I assume the response is invalid.
So the option I choose: Field to Test is "Response headers" and Pattern matching rule is "substring" and Pattern to Test is "Set-Cookie"
Response for the sampler is shown below. The expected response header "Set-Cookie" is returned from the server. Hence, the assertion is passed.
Example 5: I am expecting "404" as a response code. Or else, I assume the response is invalid.
So the option I choose: Field to Test is "Response Code" and Pattern matching rule is "equals" and Pattern to Test is "404"
Response for the sampler is shown below. The expected response code "404" is returned from the server. However, the assertion is failed (Refer the icon against SINGLE USER NOT FOUND sampler in the below image). The reason for this failure is that JMeter consider 4xx or 5xx as error by default and it wont consider it as passed even if you specifically instructed.
To avoid the above problem,we need to check "ignore status" as well in Field to Test. Refer below 
Response for the sampler is shown below. The expected response code "404" is returned from the server. Hence, the assertion is passed
Hopefully you understood the response assertion in JMeter now.

Thursday, May 7, 2020

Basic Git Commands with Example - Part II

Hope you read and understood the usage of git commands discussed in my previous post. If not, read the post first before proceed further here. Let us discuss some more important git commands which are widely used in the projects.

11. git clone
This command is used to clone a repository from an existing URL/remote repository. Remote repository is nothing but github repository or bitbucket repository where your project files (including your team member files). 

Assume that you are joining a new project and they have already created so many files and stored it in github. Now before you want to start your work, you have to download their project files to your local machine and start writing/modifying the files.

As you remember, we had created "GitDemo" working directory earlier. Let us go and see what are the files at this moment before cloning. You are seeing ".git and GitDemo.py" files.


Now, I have created github repository called "sample" which can be considered as remote repository.


Let us clone the remote repository into our working directory by using "git clone <URL>"


Now let us go to working directory "GitDemo" and see what are the files available.


Now remote repository is cloned to your working directory. You can start making changes locally now.

NOTE: To create remote repository, you need to create github account and create a new repository. Also, to find out the URL for repository, you need to open the repository and click on clone like below.


Golden rule in Git: Never work in master branch. Create your own branch and do all the changes in the file and then merge it with master branch.

12. git branch
This command is used to create a new branch. In my case, I navigated to "sample" folder which is my new working directory and create a branch here to make changes in the files available in sample folder (which was cloned from remote repository).

Before creating branch, I would like to know what branch it is currently in. To do so, I am executing the command "git branch -a" which shows all the branches in the current working directory.


As shown above, my current branch is master (current branch is always highlighted in green color with * symbol).

Let us create a new branch called "FirstBranch" using the command "git branch FirstBranch"


Now, you can see FirstBranch is created. However, current branch is still master, not FirstBranch. So, we need to change current branch to FirstBranch and start modifying/writing the changes in the directory.

13. git checkout 

This command is used to switch from one branch to another. In my case, I wanted to switch from master to FirstBranch.


Now you can see the current branch is FirstBranch. You are all set to go for updating the files.

Let us modify a file called "First.py" and then will push the changes to local&remote repository. Before modifying the file "First.py" looks like below


I made some changes in the file and now it looks like 


Now, you need to run git add, git commit commands to make sure the changes happen in staging area and committed files area. 


14. git push

You made changes and committed in your branch(FirstBranch) at your local repository. But remember, your changes are not implemented in your local master branch (master) and your remote master branch (which is in github). To do so, you have to follow some sets of commands. The very first one is "git push". Execute the following command "git push -u origin <branch name>"


Now list out the branches in your local & remote repository.


Remote repository in github looks like below (2 branches - FirstBranch & master)


15. git pull

This command will retrieve all the files from the master branch of remote repository to your local repository. As many people working on the same master files, we need to make sure that the latest changes are retrieved to your local repository from remote before you merge the changes what you made so far. To do so, we are using "git pull" command.


16. git merge

This command is used to merge the specified branch’s history into the current branch.

First step in merging is your current Branch (FirstBranch) to your local master branch(master). Then your local master branch will be pushed to your remote repository master branch (github master branch)

To do the above statement, you should switch your current branch from FirstBranch to master. Then make sure your master branch is up to date like remote repository. 


Now, let us merge the changes with master branch.


Now your master branch in local repository has the modified files (First.py). You can push the changes to your remote repository in github.


Now you connect your remote repository (github) and check master branch. You will be able to see the changes made in First.py file


Now, we have done our changes and pushed it to your remote repository. Hence, we can delete the branches from local and remote repository. Let us list out the branches available now.


Now let us delete branch we created "FirstBranch" in local repository first. 


Now let us delete branch we created "FirstBranch" in remote repository. 


That's all. Simple, Isn't it? 😀.

Note, there are many more commands in git. But, they are not used very frequently. 


Wednesday, May 6, 2020

Basic Git Commands with Example - Part I

Now days, knowing version control tool is must when you are working in a team (including Development, QA team, and Devops etc.,) and agile project. Github is one of the famous version control tool in current world, it is distributed and open source. 

In this post, I am going to give some basic idea about how to use git commands.

Pre-requisite: Git needs to be installed in your system. In this post, I will show you the commands and the operations using Git Bash which is installed in my machine. To make sure if git is installed correctly, run the command "git --version".


Assumption: You already know the stages of git which are working directory, staging area and committed files area and the flow from your working directory to committed area.

1. git init

Whenever you want to work on git, you have to instruct git to track your project directory. So, any changes you made in the directory will be tracked by git. To do so, you have to execute the command "git init"

In my case, I have created a folder(directory) called GitDemo and placed my project file(GitDemo.py) in this directory and I would like git to track all the changes in this directory.


Now, I am going to instruct git to track this directory using gitbash.

After executing this command, you will see the hidden folder called .git created in your directory.
From now on, git will track this directory until you explicitly ask git not to do so.

2. git status

Now you wanted to list out the files which are untracked or modified files in your directory. To find out that, you can use "git status" command


In my case, "GitDemo.py" file is untracked and it was highlighted in red color

3. git add

As you see, there is one file which is not tracked so far and you would like to add it to your staging area. Currently your directory is in working directory stage and the file "GitDemo.py" is in working directory at the moment. 

You want to add this file to staging area by executing the command "git add -A" or "git add ."


Note, "GitDemo.py" color has been changed to green which means it is stored in staging area.

4. git reset
Lets say that you made some mistake in "GitDemo.py" and you stored this file already in staging area. Now, you want to revert back from staging area. You have to execute the command "git reset" for this.


Now you can see "GitDemo.py" file back to red color and say untracked file.

5. git commit
Hope you created a file and stored it in staging area. Now, you want to commit the changes in the local repository (nothing but committed area in your local). This command records the file permanently in the version history. To do so, you will have to execute the command "git commit -m "<your message related to the changes>"


In my case, GitDemo.py file is committed very first time in to local repository. Now if you do "git status" command, you will see the message "nothing to commit,  working tree clean"


6. git log
This command is used to list the version history (number of commits) for the current branch (Don't worry about branch at this moment, I will talk about it in upcoming posts. Stay tuned). 

In my case, I have done only one commit and it will be displayed. Note, each commit has its own commit id which is 40 digit alphanumerical value.


Let me make some changes in "GitDemo.py" and commit the changes again.

Before change:


After change:


Now, let me run "git log" command. You will be able to see two commit ids along with messages for each commit


7. git show
This command shows the content changes of the specified commit. This command can be executed either "git show" or "git show <Filename>". 


In the above snapshot, highlighted lines in red color are removed from previous commit and green color lines are added from previous commit.

8. git diff
This command shows the file differences which are not yet staged. As you know, the latest commit version of "GitDemo.py" is having two lines of code. 


Now, I am adding one more line in the "GitDemo.py" file. However, I am neither saving it nor storing it in stage area. The current file looks like 


Let me execute "git diff" command and see the result


9. git config
When you are working with multiple people or in a team, you want to know the changes done by others and others are also keen to view your changes in the file. So, it is important to inform git that this is the author who made the changes in the file and what are those changes. To do so, you have to use "git config" command.

Before executing "git config" command, your working directory shows like 


Now, you are setting the config values as below


After setting the config values, you will see the below screen


Let us assume that I have made some changes in the file and committed the file. When I ran "git log" command, I could see my name and date/time when I commit the file. This will help others to see who committed and when it was committed.


10. rm -rf .git
Let us assume that you are done with this project and you want to instruct git to untrack the project. To do so, you have to execute "rm -rf .git" command.


Now go and see the working directory and there wont be any ".git" folder


Hope these commands help you to start with git. Let me come up with more commands in my next post. Happy reading 😀.

Linux Series - SED Utility/Package - 4. Deleting Lines

Let’s explore sed’s explicit delete command, which you specify by using the option 'd'. Again, we are using the sample file named ...