Showing posts with label Loadrunner. Show all posts
Showing posts with label Loadrunner. Show all posts
Monday, March 30, 2020
Friday, February 28, 2020
Performance test script creation for GraphQL API calls using Jmeter and Loadrunner
Suppose,
the application doesn’t have user interface and the application works based on
the end point URL and the message posted through body of the request. The
application team provides the API calls which are using GraphQL and application team wanted to do performance testing for those API calls. You can follow the below approach for developing script
Pre-requisites:
- URL
- Headers
- Body message (its applicable only for POST or PUT method)
- Format of the body message (In this case, GraphQL).
Step #1 : Validate the API call manually using Postman.
- Create the POST request in Postman
- Update URL, Method, Headers like below

The below example shows POST method. Hence, it is required body message as well.


Send the request (click on Send button). You will get the response for that API call.

In Postman, Click on Code -> Select cURL in Filter Language and Copy the raw message shown in the below picture

Step #2: Now you have valid API call details. Let us start scripting in Loadrunner now.
Open Virtual User Generator -> Click on New -> Select Web - HTML/HTTP protocol

Step #3: Insert the new step (web_custom_request) and provide URL, Method an Body message.


Step #4: Include the header details in the script

Step #5: Execute the script

Now, you will see the same response message in both loadrunner and Postman.
NOTE: The difference between raw message format and Graph QL message format in Loadrunner is, just to add "{"query":" before the body message and "}" after the message.
Let us see how we can create the script using Jmeter now.
Step #1: Open Jmeter -> Create new test plan -> Create new thread group -> Create HTTP sampler

Step #2: Add Header Manager under HTTP Sampler

Step #3: Add Listener (View Results Tree) under Thread Group

Step #4: Update URL, Path and Paste the message copied from Postman (refer Postman pictures) in HTTP Sampler Body

Step #5: Add the headers in HTTP Header Manager

Step #6: Run the script. Check the response in View Results Tree

The result is same as Postman result.
Simple 😀. Isn't it??
Saturday, December 8, 2018
Performance Testing Techniques for Oracle ADF Applications
1.0 Introduction:
This
document gives an insight on the process of creating the performance test scripts
for Oracle ADF/Fusion application using HP Loadrunner tool
2.0 Preserving
View State, Controller State, and Other ADF Query Parameters:
ADF
Faces is stateful and maintains state in two places:• View state is preserved in a hidden form field on each page. This hidden form field can either contain an ID that is used to locate its view state on the server (server state saving), or it will contain a hexadecimal encoding of the view state (client state saving)
• Controller state and other session info is preserved as query parameters on the URL (e.g.,_adf.ctrl-state, _afrLoop, _afrWindowMode, _afrWindowId, _afPfm, _rtrnI3.0 Important settings in Recording options:
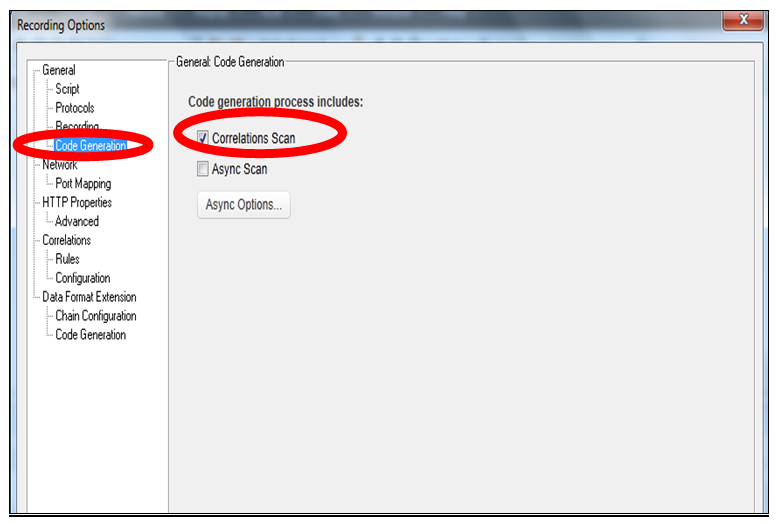
3.0 Important settings in Recording options:
Code Generation

HTTP Properties -> Advanced -> Header
Add the following headers in the recording header list.
Ø Adf-rich-messag
Ø Adf-ads-page-id
Ø Soapaction
Ø User-agent
Ø Authenticate
ØUA-CPU

Import
the following correlation rules (Everest and SFDC)

Correlations
-> Configuration

4.0 Errors and Resolution:
In Oracle ADF application,
verification is done based on the snapshot. Comparing the recorded snapshot and
replaying snapshot. It should be same except the view state values.
Snapshot is
different. Recorded snapshot is XML and replay snapshot is Web Page (Like
below)

Resolution:
Add the following function above the request
Web_add_header(“Adf-Rich-Message”,”true”);

In some test cases, you have to do print which will open a new
browser and it gets recorded in the script as well. While replaying that
request, Snapshot is different looks like below.

Resolution:
Add the following function above the request.
Here “_rtrnId_1” is the correlated value and it captured before this request.
web_add_header("adf-dialog-return-id",lr_eval_string("{_rtrnId_1}"));

JSESSION id is created in controller.jsp request under action.
While replaying the script for multiple iterations, the script will fail after
1st iteration at controller.jsp request saying that “No match found
for JSESSION”
Resolution:
Place
the JSESSION correlation in “IF” loop like below.
if(strcmp("{JSESSION}",lr_eval_string("{JSESSION}")) == 0 )
{
{
web_reg_save_param_ex(
"ParamName=JSESSION",
"LB/IC=\";jsessionid=",
"RB/IC=\";",
SEARCH_FILTERS,
"Scope=Body",
"IgnoreRedirections=Yes",
"RequestUrl=*/controller.jsp*",
LAST);
}
"ParamName=JSESSION",
"LB/IC=\";jsessionid=",
"RB/IC=\";",
SEARCH_FILTERS,
"Scope=Body",
"IgnoreRedirections=Yes",
"RequestUrl=*/controller.jsp*",
LAST);
}

In some requests like copy quote and save quote has unique value
captured while recording which is nothing but epoch time in milliseconds. We
need to replace that value based on the replay time.
Resolution:
Add the following function above the request. web_save_timestamp_param(“EpochTimeStampNow”,LAST);
EpochTimeStampNow is a LR
variable to save the epoch time in milliseconds and it does not need to declare
in script.

There are correlation values like viewstate, viewstatemac,
viewstatecsrf, captured as part of script enhancement. These values are passing
either web_submit_data or web_custom_request. If the values are passing in
web_custom_request, then it needs to be converted to URL format.
Resolution:
Add the
following function above the request.
web_reg_save_param_ex(
"ParamName=viewStateCsrf__1",
"LB/IC=ViewStateCSRF\" value=\"",
"RB/IC=\" />",
SEARCH_FILTERS,
"Scope=Body",
"RequestUrl=*/OPTY_AccountPartnerSelection_New_VP*",
LAST);
"ParamName=viewStateCsrf__1",
"LB/IC=ViewStateCSRF\" value=\"",
"RB/IC=\" />",
SEARCH_FILTERS,
"Scope=Body",
"RequestUrl=*/OPTY_AccountPartnerSelection_New_VP*",
LAST);
Add the following function below the request. web_convert_param("viewStateCsrf__1_URL2",
"SourceString={viewStateCsrf__1}",
"SourceEncoding=HTML",
"TargetEncoding=URL",
LAST);
"SourceString={viewStateCsrf__1}",
"SourceEncoding=HTML",
"TargetEncoding=URL",
LAST);

Hope this post will help you to understand some basics when you start to work in Oracle ADF application performance testing.
Happy reading 😃
Happy reading 😃
Wednesday, September 3, 2014
Loadrunner - Errors and Solutions
Problem 1:
When you are downloading the raw data from the graphs in Analysis, sometime you may get the below error.
"The raw data you are trying to retrieve contains too many rows(100001). You can retrieve a maximum of 100000 rows. Would you like to retrieve the first 100000 rows?"

"The raw data you are trying to retrieve contains too many rows(100001). You can retrieve a maximum of 100000 rows. Would you like to retrieve the first 100000 rows?"
Reason:
By default, Analysis handles not more than 100000 of records in raw data to prevent of the data is loading into memory which could be risk. If the result is more that that value, then raw data is not loaded.
Solution:
To avoid this error, you can follow the steps.
1. Close all Loadrunner related files. Go to the Loadrunner installation path

2. Open "GeneralSetting.txt" document in notepad.
3. Go to the section [General] and add the below text under [General] section.
RawDataLimit=100000000
Where, 100000000 is the maximum raw data value which you mentioned. You can mention any value as per your requirement.
1. Close all Loadrunner related files. Go to the Loadrunner installation path
2. Open "GeneralSetting.txt" document in notepad.
3. Go to the section [General] and add the below text under [General] section.
RawDataLimit=100000000
Where, 100000000 is the maximum raw data value which you mentioned. You can mention any value as per your requirement.

Now Open Analysis and download the raw data without any issues. Simple, isn't it?
Problem 2:
When you are executing the test in Performance center/Controller, sometime you may get the below error.
"Error: The user files were not transferred to the local load generator"

"Error: The user files were not transferred to the local load generator"
Reason:
The parameter file in the script got corrupted while uploading the script in performance center/controller.
Solution:
To avoid this error, you can follow the steps.
1. Go to the script folder and open the <script name>.prm file in any text editor.
2. Search 'Table=' and check the parameter file name against Table=*.dat. It needs to be same. Or else, please update the name in <script name>.prm with case sensitive. Refer the snapshot below.

1. Go to the script folder and open the <script name>.prm file in any text editor.
2. Search 'Table=' and check the parameter file name against Table=*.dat. It needs to be same. Or else, please update the name in <script name>.prm with case sensitive. Refer the snapshot below.
Now upload the script in zip format in performance center/controller and execute the test. Simple, isn't it?
After made the above changes, still you are facing an issue. No worries. Follow the below steps.
1. Delete the script from performance center/controller.
2. Change the script name in your local copy. (Make sure script name is small)
3. Then upload the script again to performance center and execute it.
Problem 3:
When you are replaying the script in VuGen, sometime you may get the below error.
"Error -27780: [GENERAL_MSG_CAT_SSL_ERROR]connect to host "<Application URL>" failed: [10054] Connection reset by peer"

"Error -27780: [GENERAL_MSG_CAT_SSL_ERROR]connect to host "<Application URL>" failed: [10054] Connection reset by peer"
Reason:
Application is using SSL version TLSv1, however while running the script from Loadrunner, by default it is sending SSL version SSL2/3. This is the root cause of the problem
Solution:
Application is using SSL version TLSv1, however while running the script from Loadrunner, by default it is sending SSL version SSL2/3. This is the root cause of the problem
Solution:
To avoid this error, you can follow either one of the steps mentioned below.
a) Include the below statement at the first line of Vuser_init section.
b) In the recording options, Go to Port Mapping -> Options -> Click on "Enable auto SSL detection" and select SSL version as "TLS 1.x". Then Click on Update and save the changes.
Then regenerate the script with the updated settings.
Now Open the script in VuGen and replay it without connection reset error. Simple, isn't it?
a) Include the below statement at the first line of Vuser_init section.
web_set_sockets_option("SSL_VERSION","TLS");
Then regenerate the script with the updated settings.
Now Open the script in VuGen and replay it without connection reset error. Simple, isn't it?
Thursday, November 14, 2013
How to create a correlation rule in Loadrunner
Suppose you are working in a web application and it has 10 business scenarios to be scripted as part of your performance testing. There is a correlation for session id which will be used in all the scenarios.
In this case, we do not need to spend time to correlate the session id in each scenario. Instead, we can create the correlation rule and the rest will be taking care by VuGen while recording.
Lets see how are we going to create the correlation rule in VuGen. Consider that we are working in Mercury Web Tours application.
Pre-requisite: You know the left and right boundary for the session ID.
Step 1: Open the recording option -> Correlation -> Check "Enable correlation during recording"

Step 2: Click on New Application and enter the name of the application. In our case, its "Mercury"

Step 3: Select Mercury in the left panel and Click on New Rule. Then enter the rule name "Session ID". In the right hand side, you need to update the left and right boundary value.
Also provide the correlation variable name. In our case, its "Param_SessionID".

Step 4: Click on Advance button. Check "Replace with parameter only for exact parameter". Then click on OK.

Step 5: Start recording the business flow. Once the recording is done, check the script.
VuGen automatically done the correlation for Session ID and replaces all the occurrences.


It's over. Simple, Isn't it?
In Summary, You can create "N" number of rules under the application. So that VuGen will automatically correlated based on your rules placed under the application.
Monday, November 4, 2013
How to disable Data Execution Prevention (DEP) in Windows 7 and above
Problem:
Sometimes, VuGen will not record any events while recording the AUT. If you raise a HP ticket for this problem, HP team will ask you to check your DEP settings is disabled.
Now we see how to disable the DEP settings in Windows 7 and above machines.
Steps:
1. Login to Windows with a user account that has administrative privileges.
2. From a DOS command line run the command "> bcdedit.exe"
Confirm the default value for the "nx" parameter. If it is OptIn, then DEP is enabled.

3. Disable DEP by setting the "nx" parameter to "AlwaysOff" using the command "> bcdedit.exe /set nx AlwaysOff"

4. Rerun the command in step 2 above and verify that the "nx" parameter is set to "AlwaysOff".

5. Reboot the system to ensure that the "nx" parameter setting takes effect and DEP is disabled.
Sunday, November 3, 2013
The art of reusing the code snippets in loadrunner
Problem:
While working in Loadrunner, you may across the situation where some codes/functions are repeated in most of the scripts. In that case, you can create one function and reuse the function in all the scripts. It would help you to reduce your effort in terms of scripting and time.
Solution:
This can be achieved by creating the header file. Now we will see how to create the header file and reuse the code in loadrunner.
Steps:
1. Open the notepad and write the below function.
#ifndef _MYCODES_H_
#define _MYCODES_H_
int multiplyNumbers(int arg1, int arg2, int arg3)
{
return arg1 * arg2 * arg3;
}
#endif
PS: This is an example function to calculate the multiplication of three numbers.
2. Save this file as "MyCodes.h" in the following path
<Loadrunner Installation Directory>\include

Now you created a header file. You can use this header file in script by calling #include "MyCodes.h" as preprocessing directory in Global.h
How to call the function in loadrunner script
1. Include the header file in Global.h

2. Call the function available in header file in action

Hope this might help for you to reuse your codes and reduce the effort in time and cost.
Wednesday, July 10, 2013
An unsupported operation was attempted in Loadrunner
Problem:
While running the test in Loadrunner controller,"An unsupported operation was attempted" message occurred after clicking on error message and also output message box is empty.
Reason:
This error occurs due to the corruption of OLE (Object linking and embedding) file related to Input Output in LR installation.
Solution:
1. Close all the LR related components in the machine.
2. Register the service. Please run the below command
"regsvr32 C:\Program Files\HP\LoadRunner\bin\outputuiproj1.ocx"
3. Rename the file "outputuiproj1.ocx" to "output~1.ocx"
4. Restart the machine.
Now your problem is solved.
Subscribe to:
Posts (Atom)
Linux Series - SED Utility/Package - 4. Deleting Lines
Let’s explore sed’s explicit delete command, which you specify by using the option 'd'. Again, we are using the sample file named ...

-
In the current IT world, authorization is one of the important factor to consider while building the system/infrastructure and it is used to...
-
 Suppose, the application doesn’t have user interface and the application works based on the end point URL and the message posted throu...
 -
In Jmeter, logic controllers is very important component and it is useful when you want to build scenario with some logics/conditions/percen...