Saturday, December 8, 2018

Performance Testing Techniques for Oracle ADF Applications


1.0 Introduction:

This document gives an insight on the process of creating the performance test scripts for Oracle ADF/Fusion application using HP Loadrunner tool
2.0 Preserving View State, Controller State, and Other ADF Query Parameters:
ADF Faces is stateful and maintains state in two places:
• View state is preserved in a hidden form field on each page. This hidden form field can either contain an ID that is used to locate its view state on the server (server state saving), or it will contain a hexadecimal encoding of the view state (client state saving)
• Controller state and other session info is preserved as query parameters on the URL (e.g.,_adf.ctrl-state, _afrLoop, _afrWindowMode, _afrWindowId, _afPfm, _rtrnI3.0 Important settings in Recording options: 

3.0 Important settings in Recording options: 
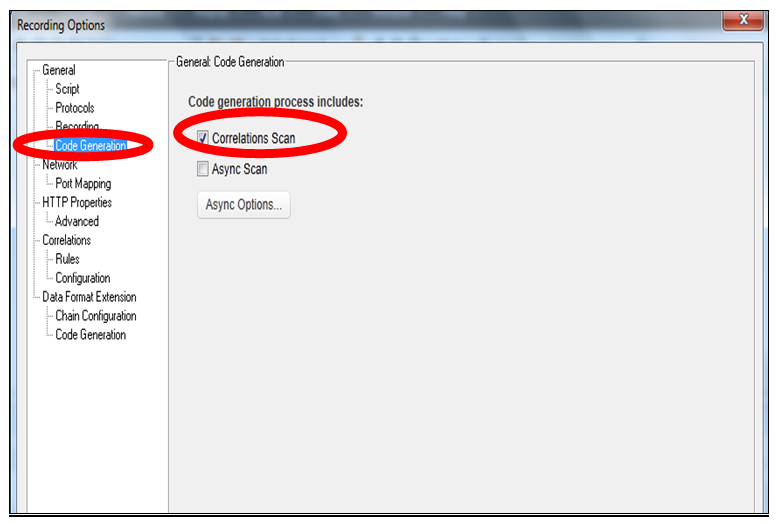
Code Generation
HTTP Properties -> Advanced
HTTP Properties -> Advanced -> Header
Add the following headers in the recording header list.
Ø Adf-rich-messag
Ø Adf-ads-page-id
Ø Soapaction
Ø User-agent
Ø Authenticate
ØUA-CPU
Correlations -> Rules
Import the following correlation rules (Everest and SFDC)
Correlations -> Configuration
4.0 Errors and Resolution:
In Oracle ADF application, verification is done based on the snapshot. Comparing the recorded snapshot and replaying snapshot. It should be same except the view state values.

Snapshot is different. Recorded snapshot is XML and replay snapshot is Web Page (Like below)
Resolution:
 Add the following function above the request
Web_add_header(“Adf-Rich-Message”,”true”);
In some test cases, you have to do print which will open a new browser and it gets recorded in the script as well. While replaying that request, Snapshot is different looks like below. 
Resolution:
 Add the following function above the request. Here “_rtrnId_1” is the correlated value and it captured before this request.
web_add_header("adf-dialog-return-id",lr_eval_string("{_rtrnId_1}"));
JSESSION id is created in controller.jsp request under action. While replaying the script for multiple iterations, the script will fail after 1st iteration at controller.jsp request saying that “No match found for JSESSION”
Resolution:
Place the JSESSION correlation in “IF” loop like below.
if(strcmp("{JSESSION}",lr_eval_string("{JSESSION}")) == 0 )
{
    web_reg_save_param_ex(
        "ParamName=JSESSION",
        "LB/IC=\";jsessionid=",
        "RB/IC=\";",
        SEARCH_FILTERS,
        "Scope=Body",
        "IgnoreRedirections=Yes",
        "RequestUrl=*/controller.jsp*",
        LAST);
}
In some requests like copy quote and save quote has unique value captured while recording which is nothing but epoch time in milliseconds. We need to replace that value based on the replay time.
Resolution:
Add the following function above the request. web_save_timestamp_param(“EpochTimeStampNow”,LAST);
EpochTimeStampNow is a LR variable to save the epoch time in milliseconds and it does not need to declare in script. 
There are correlation values like viewstate, viewstatemac, viewstatecsrf, captured as part of script enhancement. These values are passing either web_submit_data or web_custom_request. If the values are passing in web_custom_request, then it needs to be converted to URL format.
Resolution:
Add the following function above the request.
web_reg_save_param_ex(
        "ParamName=viewStateCsrf__1",
        "LB/IC=ViewStateCSRF\" value=\"",
        "RB/IC=\" />",
        SEARCH_FILTERS,
        "Scope=Body",
        "RequestUrl=*/OPTY_AccountPartnerSelection_New_VP*",
        LAST);

Add the following function below the request. web_convert_param("viewStateCsrf__1_URL2",
        "SourceString={viewStateCsrf__1}",
        "SourceEncoding=HTML",
        "TargetEncoding=URL",
        LAST);

Hope this post will help you to understand some basics when you start to work in Oracle ADF application performance testing.
Happy reading 😃

Stack Vs Heap memory in JVM


Basics of Java Memory

Let’s say you have a program running in the server/computer. Then your program need to access your server/computer’s memory.
Why do we need access to the memory?
You program may have variables to assign the data or creating few objects which needs to be stored.
In Java, the memory has been divided into two different categories.
1.       Stack
2.       Heap
JVM Memory Representation

Please note few important information.
·       In JVM, heap memory holds more memory than stack memory in size.
·       In JVM, there are many stacks and only one heap and all threads share the same heap. 
·       In multithread environment, every single thread has its own stack memory. Hence, data in the stack can be used by a thread that owns the stack. You can refer the below diagram.

let us talk about Stack.
What is stack memory?
1.       Stack is nothing, but a data structure managed by JVM. It means that java knows how to allocate the data in stack and when to deallocate them from the stack.
2.       Local variables such as integer, double will be stored in stack memory as their life will be short.
3.       Whenever function is called, the local variable of that function will be pushed on the stack.
4.       When you reach the end of program or end of code block, all local variables of the program/code will be destroyed from the stack and stack will be empty.
5.       Stack memory has been allocated by following first in last out algorithm (FILO). You will understand after seeing the below allocation/deallocation representation.
Allocating data in stack memory


Step # 1: First data (Satheesh) is allocated in to stack memory.
Step # 2: After the first data is allocated the stack memory will be like this.


Step # 3: Second data (Pandian) is allocated in to stack now.
Step # 4: Now the stack will be like below after adding the second data.
Each time when the new data added into the stack, the data which was added first will be pushed down to the bottom of the stack.
Deallocating data in stack memory
When the data scope is completed, it will be deallocated from stack memory. So, the last added data will be removed from the stack first and earlier data will be removed when it comes to the top of the stack.
Hope you understood what is stack and how the memory has been allocated to data in stack memory.
Now let us see what is heap memory.
·       Heap memory allows to store the data which has longer life than function/code block. For example, when you create an object and access through multiple function, the life time of object is long.
·       Objects are created and stored in heap memory and the newly created objected was referenced by a variable. But this variable will be stored in stack memory. 
For example, you are creating some variables in your program like below and let us see how the memory will be allocated in JVM for those variables.
int iLoop = 8;
Customer Satheesh = new Customer();
Customer object can be reference from other function/method as well.
That's all for now. Hope this article gives you some insight about JVM memory allocation.
Happy reading 😃


Wednesday, September 3, 2014

Loadrunner - Errors and Solutions


Problem 1:
When you are downloading the raw data from the graphs in Analysis, sometime you may get the below error.
"The raw data you are trying to retrieve contains too many rows(100001). You can retrieve a maximum of 100000 rows. Would you like to retrieve the first 100000 rows?"


Reason:
By default, Analysis handles not more than 100000 of records in raw data to prevent of the data is loading into memory which could be risk. If the result is more that that value, then raw data is not loaded. 

Solution:

To avoid this error, you can follow the steps.

1. Close all Loadrunner related files. Go to the Loadrunner installation path


2. Open "GeneralSetting.txt" document in notepad.
3. Go to the section [General] and add the below text under [General] section.
                RawDataLimit=100000000

Where, 100000000 is the maximum raw data value which you mentioned. You can mention any value as per your requirement. 


Now Open Analysis and download the raw data without any issues. Simple, isn't it?

Problem 2:
When you are executing the test in Performance center/Controller, sometime you may get the below error.
"Error: The user files were not transferred to the local load generator"


Reason:
The parameter file in the script got corrupted while uploading the script in performance center/controller. 


Solution:

To avoid this error, you can follow the steps.

1. Go to the script folder and open the <script name>.prm file in any text editor.
2. Search 'Table=' and check the parameter file name against Table=*.dat. It needs to be same. Or else, please update the name in <script name>.prm with case sensitive. Refer the snapshot below.

Now upload the script in zip format in performance center/controller and execute the test. Simple, isn't it?

After made the above changes, still you are facing an issue. No worries. Follow the below steps.
1. Delete the script from performance center/controller.
2. Change the script name in your local copy. (Make sure script name is small)
3. Then upload the script again to performance center and execute it.


Problem 3:
When you are replaying the script in VuGen, sometime you may get the below error.
"Error -27780: [GENERAL_MSG_CAT_SSL_ERROR]connect to host "<Application URL>" failed: [10054] Connection reset by peer"


Reason:
Application is using SSL version TLSv1, however while running the script from Loadrunner, by default it is sending SSL version SSL2/3. This is the root cause of the problem

Solution:

To avoid this error, you can follow either one of the steps mentioned below.

a) Include the below statement at the first line of Vuser_init section.


                web_set_sockets_option("SSL_VERSION","TLS"); 

b) In the recording options, Go to Port Mapping -> Options -> Click on "Enable auto SSL detection" and select SSL version as "TLS 1.x". Then Click on Update and save the changes.

Then regenerate the script with the updated settings. 

Now Open the script in VuGen and replay it without connection reset error. Simple, isn't it?

Thursday, November 14, 2013

How to create a correlation rule in Loadrunner


Suppose you are working in a web application and it has 10 business scenarios to be scripted as part of your performance testing. There is a correlation for session id which will be used in all the scenarios. 

In this case, we do not need to spend time to correlate the session id in each scenario. Instead, we can create the correlation rule and the rest will be taking care by VuGen while recording.

Lets see how are we going to create the correlation rule in VuGen. Consider that we are working in Mercury Web Tours application.

Pre-requisite:  You know the left and right boundary for the session ID.

Step 1: Open the recording option -> Correlation -> Check "Enable correlation during recording"

Step 2: Click on New Application and enter the name of the application. In our case, its "Mercury"


Step 3: Select Mercury in the left panel and Click on New Rule. Then enter the rule name "Session ID". In the right hand side, you need to update the left and right boundary value.
Also provide the correlation variable name. In our case, its "Param_SessionID".


Step 4: Click on Advance button. Check "Replace with parameter only for exact parameter". Then click on OK.


Step 5: Start recording the business flow. Once the recording is done, check the script. 
VuGen automatically done the correlation for Session ID and replaces all the occurrences.


It's over. Simple, Isn't it?

In Summary, You can create "N" number of rules under the application. So that VuGen will automatically correlated based on your rules placed under the application.


Tuesday, November 12, 2013

Loadrunner Script Anatomy


When you record and save a LoadRunner script in VuGen, there are a number of files that are created. This post explains what they are and what they do.

For example, You have script named "01_TicketReservation" with one action,  then the required files you would need in the 01_TicketReservation script directory would be:

Files Created While Recording


Here's what is in each file:
01_TicketReservation.usr : Primarily, the .usr file defines which actions are used by the script. There are other properties which define which protocols are used and other settings.

default.usp: Contains the run logic for the script.

default.cfg: Contains the run-time settings (except for run-logic).

globals.h: The global headers file- visible and editable in Vugen.

*.c (Action files): These are the action files containing your script code. You can edit these files in any text editor, if you want. 

01_TicketReservation.prm: Contains the parameter definitions.

*.dat: Your data files, you can save these in the script directory or somewhere else, even a mapped network drive on a different server.

Files Created After Playback


result1: One or more result directories are created which contain script playback results.

*.idx: The .idx files are binary "index" files created by Vugen for holding parameter values.

01_TicketReservation.ci: It is a final Compiled Image of the LR script.

combined_01_TicketReservation.c:  A list of #includes for all of your Actions.

logfile.log, mdrv.log: random log files which you will probably never need to look at.

mdrv_cmd.txt, options.txt: These text files contain commands and arguments for the script compiler and driver (mdrv) and are created dynamically.

output.txt: This one is important. This file contains all of the log messages generated during script playback. The contents of this file appear in the "Output Window" section of Vugen.

output.bak: A backup of the above file.

pre_cci.c: Output from the C pre-processor, which contains all of the functions used in your script, from all of the Actions and header files.

Files Required for Playback
During the course of recording and playback of scripts, the VuGen application will create many files, but only some of them are necessary for playback (either in VuGen or the Controller).

In summary, you can delete: *.txt, *.log, *.idx, *.bak, result*, pre_cci.c, combined_*, *.ci

There is a quick shortcut you can use, rather than going through and deleting everything manually. In VuGen, Go to 'File' menu, select 'Zip Operations' and 'Export to zip file'. In the dialog, select the 'Runtime files' radio button and 'Ok'. Now you have a "clean" script without the extraneous files created by Vugen.


Advantages

  • Making LR script folder a bit smaller in size which could be beneficial, if the script needs to be archived and stored for extended periods of time.
  • Maintaining big script repository and taking regular backup of the entire script repository could be very disk-space consumption particularly if all run time data files and execution results are also unnecessarily being backed up.

Linux Series - SED Utility/Package - 4. Deleting Lines

Let’s explore sed’s explicit delete command, which you specify by using the option 'd'. Again, we are using the sample file named ...